
How to Build a House: A Complete Step-by-Step Construction Guide
Building a home from the ground up is one of the most rewarding investments you can make. Whether you are transitioning out of a rental apartment into homeownership or adding an accessory dwelling unit (ADU) to your property, understanding how to build a house step-by-step turns a complex project into an orderly, achievable process.
From initial budgeting and site selection to structural framing and final municipal approvals, every construction phase builds directly on the previous one. This comprehensive guide details each essential stage of residential construction, helping you navigate timelines, manage subcontractors, and prevent costly delays.

Step 1: Budgeting, Financing, and Site Selection
Before breaking ground, establishing a solid financial foundation is essential. Construction financing differs from standard home mortgages: lenders disburse funds in scheduled increments called “draws” as an independent inspector verifies completed construction milestones.
A realistic residential building budget covers three core areas:
- Land and site development: Purchasing the lot, clearing vegetation, grading, soil testing, and connecting municipal utilities (water, electricity, sewer/septic).
- Direct construction costs: Foundation, framing lumber, mechanical trades, roofing, and interior finishes.
- Soft costs and contingency: Architectural designs, municipal permits, and a dedicated 15% to 20% contingency fund for unforeseen site conditions.
If you are planning an affordable starter home or an efficient accessory dwelling unit, starting with practical 2 bedroom house building plans can help keep square-footage costs predictable while maximizing everyday functional living space.
Step 2: Architecture, Engineering, and Municipal Permitting
Once your lot is secured, an architect or draftsperson develops your construction blueprints. A structural engineer reviews load paths, foundation specifications, and regional climate considerations such as snow loads or seismic requirements.
Next, submit complete construction drawings to your local municipal building department. Permitting confirms compliance with safety codes, zoning setbacks, and height limits. Review times typically range from 4 to 12 weeks, so early submission prevents idle job sites.
Step 3: Site Preparation and Foundation Pouring
With permits approved, heavy machinery arrives on-site. Excavators clear trees and rocks, level the home’s footprint, and dig utility trenches and foundation footings.
Residential homes generally use one of three foundation types:
- Slab-on-Grade: A single reinforced concrete slab poured over gravel; cost-effective and common in warm climates.
- Crawlspace: Short masonry walls that elevate the living space, providing convenient crawl access for pipes and ductwork.
- Full Basement: Excavated deep walls providing extra living area, utility space, and severe weather shelter.
Poured concrete requires proper curing—typically 7 to 28 days—to reach its full structural design strength before framing begins.
Step 4: Structural Framing and Building the Weatherproof Shell
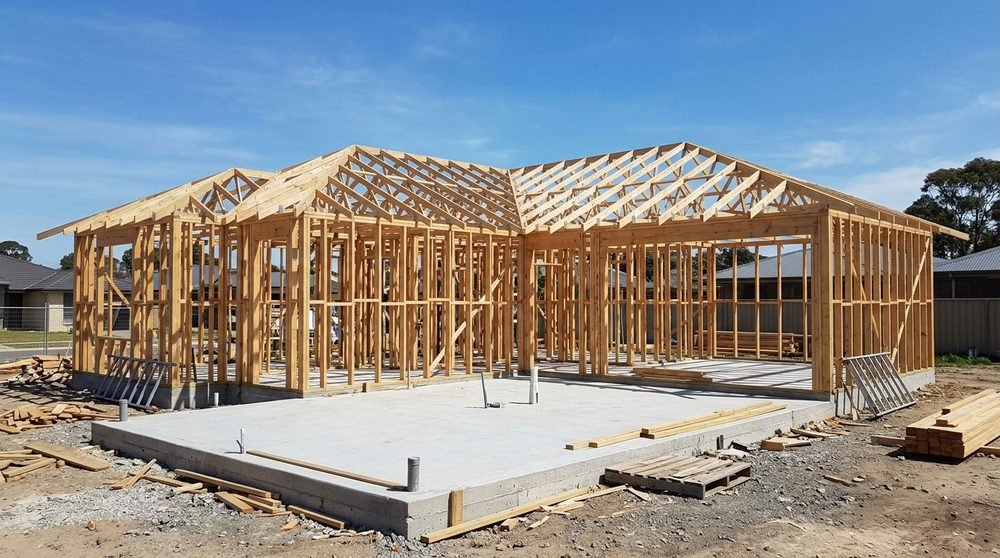
Framing is the dramatic phase where the home’s skeletal silhouette appears. Carpenters construct subflooring, exterior and interior load-bearing walls, floor joists, and engineered roof trusses.
Maintaining exact framing standards is essential during this stage. For instance, following standard building dimensions such as how far apart wall studs are spaced—typically 16 inches on center—ensures proper load distribution and provides sturdy fastening points for exterior sheathing, interior drywall, and heavy wall cabinetry.
Once lumber framing is complete, exterior walls are sheathed with OSB or plywood and wrapped in a weather-resistant barrier (house wrap). Installing exterior doors, windows, and roof shingles achieves a “dried-in” shell, safeguarding interior materials from moisture and rain.
Step 5: Mechanical, Electrical, and Plumbing (MEP) Rough-Ins
With the structure enclosed, trade specialists run vital internal systems through open wall studs and ceiling bays:
- Plumbing: Water supply lines, sewer drains, and vent stacks.
- Electrical: Wiring circuits, electrical panels, outlets, and junction boxes.
- HVAC: Heating and cooling ducting, return plenums, and refrigerant piping.
Before closing wall cavities, municipal building inspectors must sign off on all MEP rough-in work. Take extensive photos of every open wall bay before this stage concludes; these images provide an exact roadmap of hidden pipes and wires for future projects.
Step 6: Insulation, Drywall, and Interior Trim
After passing rough-in inspections, insulation is installed in exterior walls, attics, and crawlspaces using fiberglass batts, mineral wool, or spray foam to optimize energy efficiency.
Drywall boards are then fastened, taped, mudded, and sanded across multiple passes to yield seamless surfaces. Finish carpenters then install interior doors, baseboards, window trim, and moldings, defining the interior aesthetic.
Step 7: Finishes, Cabinetry, and Exterior Detailing
In this phase, functional surfaces come together. Crews install kitchen cabinetry, bathroom vanities, and quartz or granite countertops. Tile, hardwood, or luxury vinyl plank (LVP) flooring is laid, while interior painters apply primer and finish coats.
Outside, subcontractors complete siding, stucco, or brickwork, pour driveways and walkways, and complete final grading and basic landscaping to direct water away from foundation walls.

Step 8: Final Punch List, Walkthrough, and Certificate of Occupancy
Trades complete final installations of light switches, plumbing faucets, and thermostat controls. You and your contractor then complete a detailed punch list walkthrough, tagging minor cosmetic defects, paint blemishes, or hardware adjustments.
The municipal building official conducts the final inspection. Once all building, fire, and safety codes are satisfied, the city issues your Certificate of Occupancy (CO), officially granting legal permission to move into your new home.
Key Stages of Home Construction at a Glance
| Construction Stage | Estimated Time | Primary Focus | Key Milestone |
|---|---|---|---|
| 1. Planning & Permits | 1 to 3 Months | Budgeting, lot purchase, blueprints, municipal permits. | Building permit issued |
| 2. Site Prep & Foundation | 3 to 6 Weeks | Excavation, footings, and pouring concrete slab or basement. | Cured foundation inspection |
| 3. Framing & Enclosure | 4 to 8 Weeks | Wall studs, roof trusses, exterior sheathing, doors, and roofing. | Dried-in weather shell |
| 4. MEP Rough-Ins | 3 to 5 Weeks | In-wall plumbing, electrical circuits, and HVAC ducting. | Rough-in code sign-off |
| 5. Insulation & Drywall | 3 to 4 Weeks | Thermal insulation, sheetrock hanging, taping, and priming. | Paint-ready surfaces |
| 6. Finishes & Move-In | 6 to 10 Weeks | Cabinetry, flooring, fixtures, punch list walkthrough. | Certificate of Occupancy |
Frequently Asked Questions About Building a House
How long does it typically take to build a house?
Most custom single-family homes take between 7 and 12 months to complete following permit approval. Streamlined modular or production homes can take 5 to 7 months, while customized builds or severe winter weather can extend timelines past a year.
Is building a house cheaper than buying an existing home?
Buying an existing property often carries lower upfront costs and allows immediate occupancy. However, building custom gives you full design control, eliminates immediate renovation expenses, and yields modern energy efficiency that reduces lifetime utility bills.
What is the most critical stage of the building process?
The pre-construction planning phase is the most critical. Clear architectural drawings and a well-defined budget prevent mid-build changes, which are the leading cause of construction cost overruns and delays.